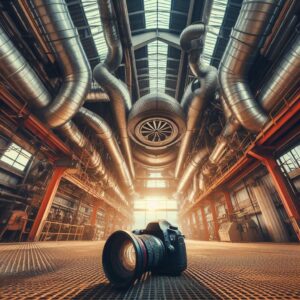
Why You Should Edit Your Photos

This post delves deep. If you can’t read the entire thing, I’ve got you. If that’s the case, I want you to take away three things that will help you gain likes and followers in Instagram aside from using Famoid:

Thing 1: Almost all photographs we view are modified in some way. The dilemma is whether we should rely on our smartphones and cameras or take deliberate control of these modifications.
Thing 2: See Reason 1 for why I believe you should take control of these modifications. This is truly the only excuse you need!
Thing 3: If you’re persuaded and want to know what modifications I do to each photo, click here and I’ll send you an email with the eight most common edits. P.S. It has little to do with style. These are the strong edits that most professional photographers utilize.

1. Your unique story
If you just remember one reason to edit your images, make it this: it has the ability to set you and your business apart in a significant manner! While there are several technical reasons why you should edit your images, the most significant is that when you use your own distinctive style, you stand out from the crowd.

2. First Impressions: Basics to Bangers
First impressions matter just as much online. According to a Harvard research, consumers create opinions about websites in a fraction of a second, emphasizing the significance of visual attractiveness.

3. FOCUS ON YOUR SUBJECT
Because we know it just takes a fraction of a second to create an opinion (and most of us have an extremely short attention span), it’s critical to bring attention to your issue. Your audience must clearly grasp what you want them to see, and they must comprehend it quickly.

4. Engagement: Almost (Instantly) Famous, Miss Penny Lane.
While there are several aspects that contribute to an engaged audience, visual material is what initially captures a viewer’s attention.

Don’t hate me, but I really adore Instagram! While Instagram is not the most crucial tool in our business, it is essential to our success. It’s like this weird thing that everyone complains about, but we’re all playing the game.


Mastering the Art of Image Editing

In today’s digital age, image editing is essential for photographers, designers, marketers, and social media enthusiasts. Adobe Photoshop is a powerful and widely-used tool for this purpose. Mastering it can be daunting, especially for beginners. Rest assured; we have crafted a comprehensive guide to aid you with Photoshop tutorials that cater to all skill levels, including Step and Repeat NYC banner creation. These guides unlock image editing software’s full potential for novices and experienced users.

Photoshop Essentials

If you’re into image editing, then you have heard of or used Adobe Photoshop. This tool is so versatile and powerful. The same reason why many professional designers, photographers, and hobbyists are using it. If you’re new to Photoshop, fear not.

Understanding the Interface

The interface might appear overwhelming when you first open Photoshop, but it’s pretty user-friendly. The workspace comprises the menu bar, toolbar, options bar, panels, and canvas. Familiarizing yourself with these elements will make your Photoshop experience smoother.

Photoshop provides many tools to manipulate images and create stunning designs.

The move tool, selection tools, brush tool, and many others are indispensable. Learn about the most frequently used tools and their keyboard shortcuts to boost productivity.

Mastering Layers

Layers are the backbone of Photoshop, allowing you to stack, edit, and organize your artwork non-destructively. Understanding layers and layer masks will allow you to experiment with your designs without altering the original image. Mastering text tools is essential in designing posters or adding text to an image. Learn how to create text layers, adjust fonts, sizes, and colors, and apply various text effects to make your text stand out.

Image Editing Techniques

mastering photo editing skills

Photoshop offers many editing tools to enhance photos and correct imperfections. Learn about adjustments like brightness/contrast, levels, and curves, as well as how to remove blemishes and unwanted objects using the healing brush and clone stamp. Take your designs to the next level with Photoshop filters and effects. From creating a vintage look to applying artistic filters, experimenting with these features can add a unique touch to your projects.

Saving and Exporting Your Work

Once you’ve created your masterpiece, saving it in the proper format is crucial. Understand the differences between PSD, JPEG, PNG, and other file formats, and learn how to export your work for web or print without compromising quality.

Getting Started with Photoshop? Master the Basics First

Photoshop, a versatile and extensively utilized software, has truly transformed the realm of digital image editing. This groundbreaking tool has not only revolutionized the way professionals like photographers and graphic designers work but has also captivated the interest of photo enthusiasts seeking to elevate their images. With the integration of real-time location systems, Photoshop presents an even more dynamic experience, empowering users to seamlessly incorporate location-based information into their creative projects.

Adjusting Brightness, Contrast, and Saturation

These adjustments are fundamental in achieving the desired tone and mood in your photos. You can make your images brighter or darker, enhance contrast to bring out details, and adjust saturation to control the intensity of colors.

Removing Blemishes and Imperfections

Photoshop provides tools like the Healing Brush and Spot Healing Brush, which allow you to seamlessly remove unwanted blemishes, wrinkles, or imperfections from portraits or other images.

Applying Filters and Effects

using Photoshop to increase exposure

Filters and effects offer endless possibilities to transform your images. Whether you want to apply a vintage look, add a soft focus effect, or create a dramatic black-and-white image. Photoshop provides an extensive library of filters and effects to choose from.

Advanced Photoshop Techniques

Once you mastered the basics, it’s time to move forward with its advanced techniques.

You’d be surprised at how these new skills and techniques can elevate your knowledge and experience.

Using Adjustment Layers for Non-Destructive Editing

Photoshop’s adjustment layers offer non-destructive editing, allowing changes to be made without permanently altering the original image. This provides flexibility for experimentation and easy fine-tuning of adjustments.

Mastering Selection Tools and Techniques

Selection tools in Photoshop, such as Marquee, Lasso, and Quick Selection, help isolate specific areas or objects for editing or manipulation. Techniques like feathering, refining edges, and layer masks enhance selection precision and integration between elements in compositions.

Creating Custom Brushes and Patterns

Custom brushes and patterns in Photoshop add unique touches to artwork. The Brush tool allows the creation or modification of brushes, enabling painting with various textures, shapes, and dynamics. Custom patterns can be tiled and used for filling areas or adding decorative elements, enhancing designs with depth, detail, and artistic flair.

How to Enhance Your Photos with Basic Editing Techniques?

Photoshop is a powerful tool for enhancing and transforming photos. For instance, there’s an image of the POC resident list that was sent and looks unclear, Photoshop can be used to improve clarity and make it more readable.

There are several things you can do with the software like allowing you to correct common issues such as lighting, color, and composition. We’ll walk through some basic editing techniques that will help you improve your photos and get the most out of this powerful software.

Correcting Exposure and Brightness

Exposure and brightness play a major role in how your photos look. Photoshop provides several tools to help you adjust these factors, including the Levels and Brightness/Contrast tools. By adjusting these settings, you can make your photos look brighter and more vibrant.

Adjusting Color Balance

Color balance is another important factor to consider when editing photos. Using Photoshop enables you to do plenty of things. For instance, you can adjust any of the following:

  • Hue
  • Saturation
  • Brightness

This gives you control over the overall mood and feel of your images.

Cropping and Resizing

Cropping and resizing are two simple techniques that can greatly improve your photos. By cropping, you can remove distracting elements from the image and improve the overall composition. By resizing, you can adjust the size and aspect ratio of your photos to better fit your needs.

Removing Imperfections

Photoshop provides several tools to help you remove imperfections from your photos, including the Clone Stamp and Healing Brush tools. These tools allow you to remove blemishes, spots, and other distracting elements from your images, giving you a cleaner and more polished result.

Enhancing Detail and Sharpness

Sharpness and detail play a major role in the overall quality of your photos. The Unsharp Mask tool allows you to enhance the sharpness of your images, making your photos look more detailed and defined.

Adding Finishing Touches

Once you’ve completed the basic editing techniques, you can add a few finishing touches to your photos to make them look their best. This may include adding a filter, adjusting the saturation, or adding a vignette.

Photoshop is a powerful tool for enhancing and transforming photos. By using the techniques outlined above, you can improve your photos and get the most out of this powerful software. With a little practice and creativity, you’ll be able to take your photos to the next level!

Photoshop Hints and Tricks for Novices


Did you know that Photoshop has been a part of our lives for 26 years? Even if you’ve never used it, you can’t deny the impact that photo editing software has had on our lives.

Change the size of an image

When you press Ctrl+T on your keyboard, a bounding box appears around the image, indicating transformation. This implies that you can now resize your image. The best way is to place the cursor on one of the box’s rectangle corners and then drag the corner while holding down the Shift key. When you’re finished, simply press Enter to exit.

Change the measurement unit

To quickly switch between units of measurement, place your cursor on one of the rulers on your grid (press Ctrl + R to show or hide the rulers), right click, and then select a new unit from the context menu. There are numerous units available, ranging from centimeters to pixels, millimeters to points, and even percents.

Lasso Magnetic Tool

To use the Magnetic Lasso, click and hold the Lasso tool’s mouse button until a fly-out menu appears. The last one with a small magnet on its icon is the Magnetic Lasso. Go to your image and place your mouse on the edge of the part you want to change. Click your mouse once, then release it and move your cursor over the edges of the object you want to select (just like you do with scissors when you cut something out).


Layers of Adjustment

A truly stunning image is usually more than meets the eye. That is why the Adjustment Layers tool is so useful. By adding a top layer to your image, you can use the Adjustment Layers tool to change the color and hue. The best part about this is that you can completely reverse your changes while keeping the rest of your image intact by adding that extra layer. Adjustment layers can be found at the bottom of the Layers Panel (a black and white circle icon).


Styles for Layers

This is a quick way to spruce up your image. Layer styles are special effects that can be applied quickly to individual layers of an imagean be applied quickly to individual layers of an image. All you have to do is double-click on a layer and then select the desired effect.


Brush for Spot Treatment


This is probably Photoshop’s most well-known tool, and it was designed to remove life’s minor imperfections. The spot header brush is that magical tool that we wish existed during our awkward adolescent years to make pimples disappear from every photograph. Simply place the brush over the area you want to “fix,” making sure it is slightly larger than the blemish, and click. To color match your image perfectly, Photoshop takes samples from around the retouched area.

What Tasks Can Photoshop Perform?

What can you do with this guy now that some of Photoshop’s restrictions have been lifted in your small business? You probably already have a great idea at this point, but let’s go through a few others just in case. This will offer you a clear understanding of the applications for Photoshop in business.

1. Photography

Great-looking images help sell whatever it is your firm has to offer, whether they are on your website or in your print marketing materials. So, your company and Photoshop have a direct relationship. Product photography is also very important for online firms, especially e-commerce businesses. I was informed over the phone by one of my clients, who has a highly successful e-commerce business called “Pictures Sell,” and I wholeheartedly concur. How often have you looked at an item you’re interested in on a retail website or even on Craigslist only to find one or two blurry photos?Low quality and limited photographs are two major deterrents to purchasing.

2. Web graphics

Product photography is important for internet enterprises, especially e-commerce businesses. I was informed over the phone by one of my clients, who has a highly successful e-commerce business called “Pictures Sell,” and I wholeheartedly concur. How often have you looked at an item you’re interested in on a retail website or even on Craigslist only to find one or two blurry photos?Low quality and limited photographs are two major deterrents to purchasing.


3. Image optimization

What the heck is that? Have you ever visited a website where the visuals took a very long time to load? That goes against image optimization!

To put it another way, those large photos require optimization!

Image optimization simply refers to reducing the file size of your image while preserving its quality and using the appropriate web-friendly graphic file format for the type of image you’re working on (which is a whole other discussion).

As you may imagine, it involves balancing. Here, you’re evaluating an image’s quality against how long it takes to load, which is mostly influenced by its file size.


4. Print materials used by your company


This was briefly discussed earlier. While you might pay a freelance designer to make materials like brochures, your business card, stickers, and more, Photoshop makes it simple to do much of this work yourself.

You may save a ton of time and money by performing this type of work in Photoshop on your own. You won’t be on a freelancer’s schedule or pay them. It’s also entertaining and clever.

When dealing with these kinds of activities, Photoshop occasionally feels a little awkward and clumsy. Additionally, we have spoken about some of Photoshop’s restrictions in this area. But if you’re just working on simple tasks, Photoshop is more than capable.


5. Social media graphics

All of your social media graphics may be handled with Photoshop. You do not need to hire assistance to complete this work, unlike the print materials for your company. Instead, you can start using Photoshop and use it to your advantage.

To be clear, I’m referring to things like your social media avatar photos, banner graphics, and so on when I say “social media graphics.” Photoshop can naturally handle this kind of material with ease.

The only information you’ll require is the correct picture dimensions to utilize for the social networking platform for which you’re creating graphics. For instance, you would need to produce a 1500 x 500 pixel image in Photoshop if you were designing your Twitter account’s header photo (the wide banner graphic that shows across the top of your account profile).

6. Fundamental video editing

Last but not least, you are already aware of Photoshop’s fundamental video editing capabilities. Currently, video editing may or may not be necessary for your organization, but internet video is massive and will continue to expand in the years to come. A great way to promote your goods and services is through video.

Additionally, as was already said, Photoshop’s (although limited) editing features can meet your basic video requirements. Photoshop can be all you need if you want to use video in your company’s marketing.

How to Create Awesome & Eye-Catching Designs with Photoshop

iMac Pro

First and foremost, when designing anything, you should always keep an eye on alignment.

Alignment is a fundamental principle of good design. Making sure all of your design elements flow together nicely is a great way to give your work a professional look and feel. Standard text alignments are center, right, and left, but you can also try out some asymmetry by aligning text to other objects in your graphic. If you notice that your design is off, try adjusting the placement of the elements. Here are some examples of cool alignment in design. Pick out a blank template that suits your needs by tapping on it.

Second tenet of design: employ hierarchy to hone in on key elements.

When working with a complex design consisting of multiple visual elements, it’s important to highlight the most crucial information. As a result, the sections or headings that draw the most attention to will be highlighted more prominently in the final design. This is known as hierarchy, and it’s crucial to the user experience beyond just being good design. One way is to use larger or bolder fonts for your typography, to physically elevate your most important message above the rest of the content, or to use shapes to visually frame the main point.

Thirdly, use contrast to draw attention to what you want to highlight in your design.

Contrast is a fundamental principle of design because it highlights and emphasizes the design’s focal points. When two visual components (such as black and white, thick and thin, modern and traditional, etc.) are at odds with one another, this is known as “contrast.” Use strong contrast to draw attention to key elements of your design.
Consider using contrasting colors or pairing bold typefaces with delicate fonts to help create variety in your design work that strategically emphasizes parts of your design. A wonderful use of contrast can be seen in the following samples. Choose a template and edit it with a tap.

Rule 4 of good design: repetition can be a powerful tool.

Designing with recurring elements like colors, fonts, words, or shapes helps create a cohesive look and feel while also aiding in the memorization of your brand or other key information. Use repetition in your content strategy by sticking to the same set of colors, fonts, and other visual elements to help people easily identify your brand.


Fifth, when arranging your visual elements, think about how close they are to one another.

Similar or related elements on a design should be clustered together to establish a connection, so proximity is also useful in creating organization. If you want to simplify the design and make the information easier to understand, you should group similar elements together. Lists, menus, and invitations are common places to encounter proximity.

The sixth rule of design is to strive for harmony.

A well-balanced design will be both beautiful and sturdy. However, this does not imply that everything must be symmetrical or the same size. Instead, the focus should be on guiding the reader’s gaze in a way that improves comprehension. Asymmetrical balance uses contrast to even out the flow of the design, while symmetrical balance uses a similar amount of weight on both sides of the design (e.g., dark elements are balanced out by light ones).


Use color wisely to strengthen your design, as recommended by design is the rule #7.

Color is an effective design tool for conveying meaning on both a conscious and subconscious level. It is possible to make use of color if you’re familiar with the fundamentals of color theory. While the color blue is often associated with feelings of peace and trust, the color red is often used to stir up passions and motivate people into action. This is why red is typically used for stop signs and the buttons that allow users to make purchases on websites. Here are 101 tried-and-true color schemes that never fail to please.


Eighth design rule: use lots of white space.

The white space in your design is as crucial as the content you include. White space (also known as negative space) serves as a shape-maker and can draw attention to what matters most in your design. You should never discount the effectiveness of brevity.
Apply these fundamental design principles to any and all of your future graphic design endeavors. It’ll start feeling natural in no time.

How To Capture Beautiful Pictures Of Your Bike Without Photoshop

From beautiful wheels to a beautifully designed single speed, the cycling eye also wants something. Many bicycle designers are fully aware of this and cleverly respond to this by accompanying the designs with beautiful photo reports.

Inspired after seeing such a beautiful report, we enthusiastically grab our own camera and bicycle and start taking pictures. Unfortunately, we often find out that the bicycle does not come into its own as well as in those beautiful reports. But don’t worry, with the following simple tips you can improve your cycling photo skills (even without Photoshop).

Tips To Improve Your Bike and Cycling Photo Skills

Clean bike and accessories

Make sure your bike is clean, and polish everything because, with a beautiful subject, you are already halfway through a beautiful photo!

Sufficient light

You naturally want your photo to be sharp and clear, so make sure you have enough light. “Yes, logical” I hear you think, but remember that our eyes need much less light than the average camera, we often make a mistake in this. So if you can, take your photos outside and make sure your shutter speed is 1/125s or faster.

Beautiful light

Light is light, isn’t it? No, for a nicely lit bike you want ‘diffused’ light, no harsh sunlight or artificial light and no direct flash. A cloudy day generally provides nice diffused light. Are we dealing with one of the rare sunny days in the Netherlands? Take your chance and take the photos around sunrise or sunset to take advantage of the beautiful light on these parts of the day. Still taking the pictures in the afternoon? Look for some trees, trees often let in enough light, but the leaves make the light nicely diffused.

Background

It may sound crazy, but the background can make the difference between just a good photo and a “wow!” photo.

For example, include slanting lines in your background for an extra sense of depth, for example put your bike in the middle of a path/road for this effect. Or choose a background that matches your bicycle in terms of color and texture, for example an old wall, an industrial building or an extensive heathland.

Do you have a camera where you can set the aperture? Then ensure that you have a large aperture (low f-number), so that your background is beautifully out of focus (also called bokeh), and your bike really stands out from the picture. When placing your bike, make sure you have enough space behind your bike, so that there is enough distance for your background to become out of focus.

Good composition

Ok! Your bike is crystal clear, you have found beautiful light and a fantastic background, now a nice report! How? By bringing everything together into beautiful compositions, a few tips:

– keep your camera straight for total shots (sometimes you have to bend your knees)
– provide variety, total shots and nice details
– don’t place your subject in the center
– try to include lines in your composition that lead the eye to the subject (see photo below)
– keep the photo clean, watch out for disturbing objects in the background or foreground
– take lots of photos!

Material

Which camera should I use for this? You can apply the above tips with any camera. It is true that with an SLR camera it is easier to create a blurred background and you need less light compared to a compact camera. If you already have an SLR camera or are planning to buy one, buy a 50mm lens with an aperture of 1.4 or 1.8. Every camera brand has an affordable 50mm lens in its range. With this you can shoot fantastic details and create blurred backgrounds, the lens with which you can improve your photography skills for little money.

In summary, go out and take a nice picture of your bike. For the best photo you first look for good light, then a nice background and finally a good composition. This way you work step by step towards a beautiful photo.

𐌢